
Vendors & bank directory
In simple words
Vendors & bank directory is part of Finance. Beneficiaries and bank details. This guide takes you through it in 8 short steps.
Where it fits in your work — Collect. Customers pay online; receipts and the ledger update on their own.
Before you start
- You need to be signed in to your company's workspace. Finance appears in the Workspace dashboard and in the left menu when your role includes it.
- What you can see and change depends on your role. If a menu item or button is missing, ask your workspace owner to give your role access in Workspace → Users.
- Vendors & bank directory belongs to Money out in Finance. Beneficiaries and bank details.
Step by step
- 1
Step 1
Open Finance
Sign in and open the Finance panel from your Workspace dashboard (or sign in to it directly). You see only what your role allows.
- 2
Step 2
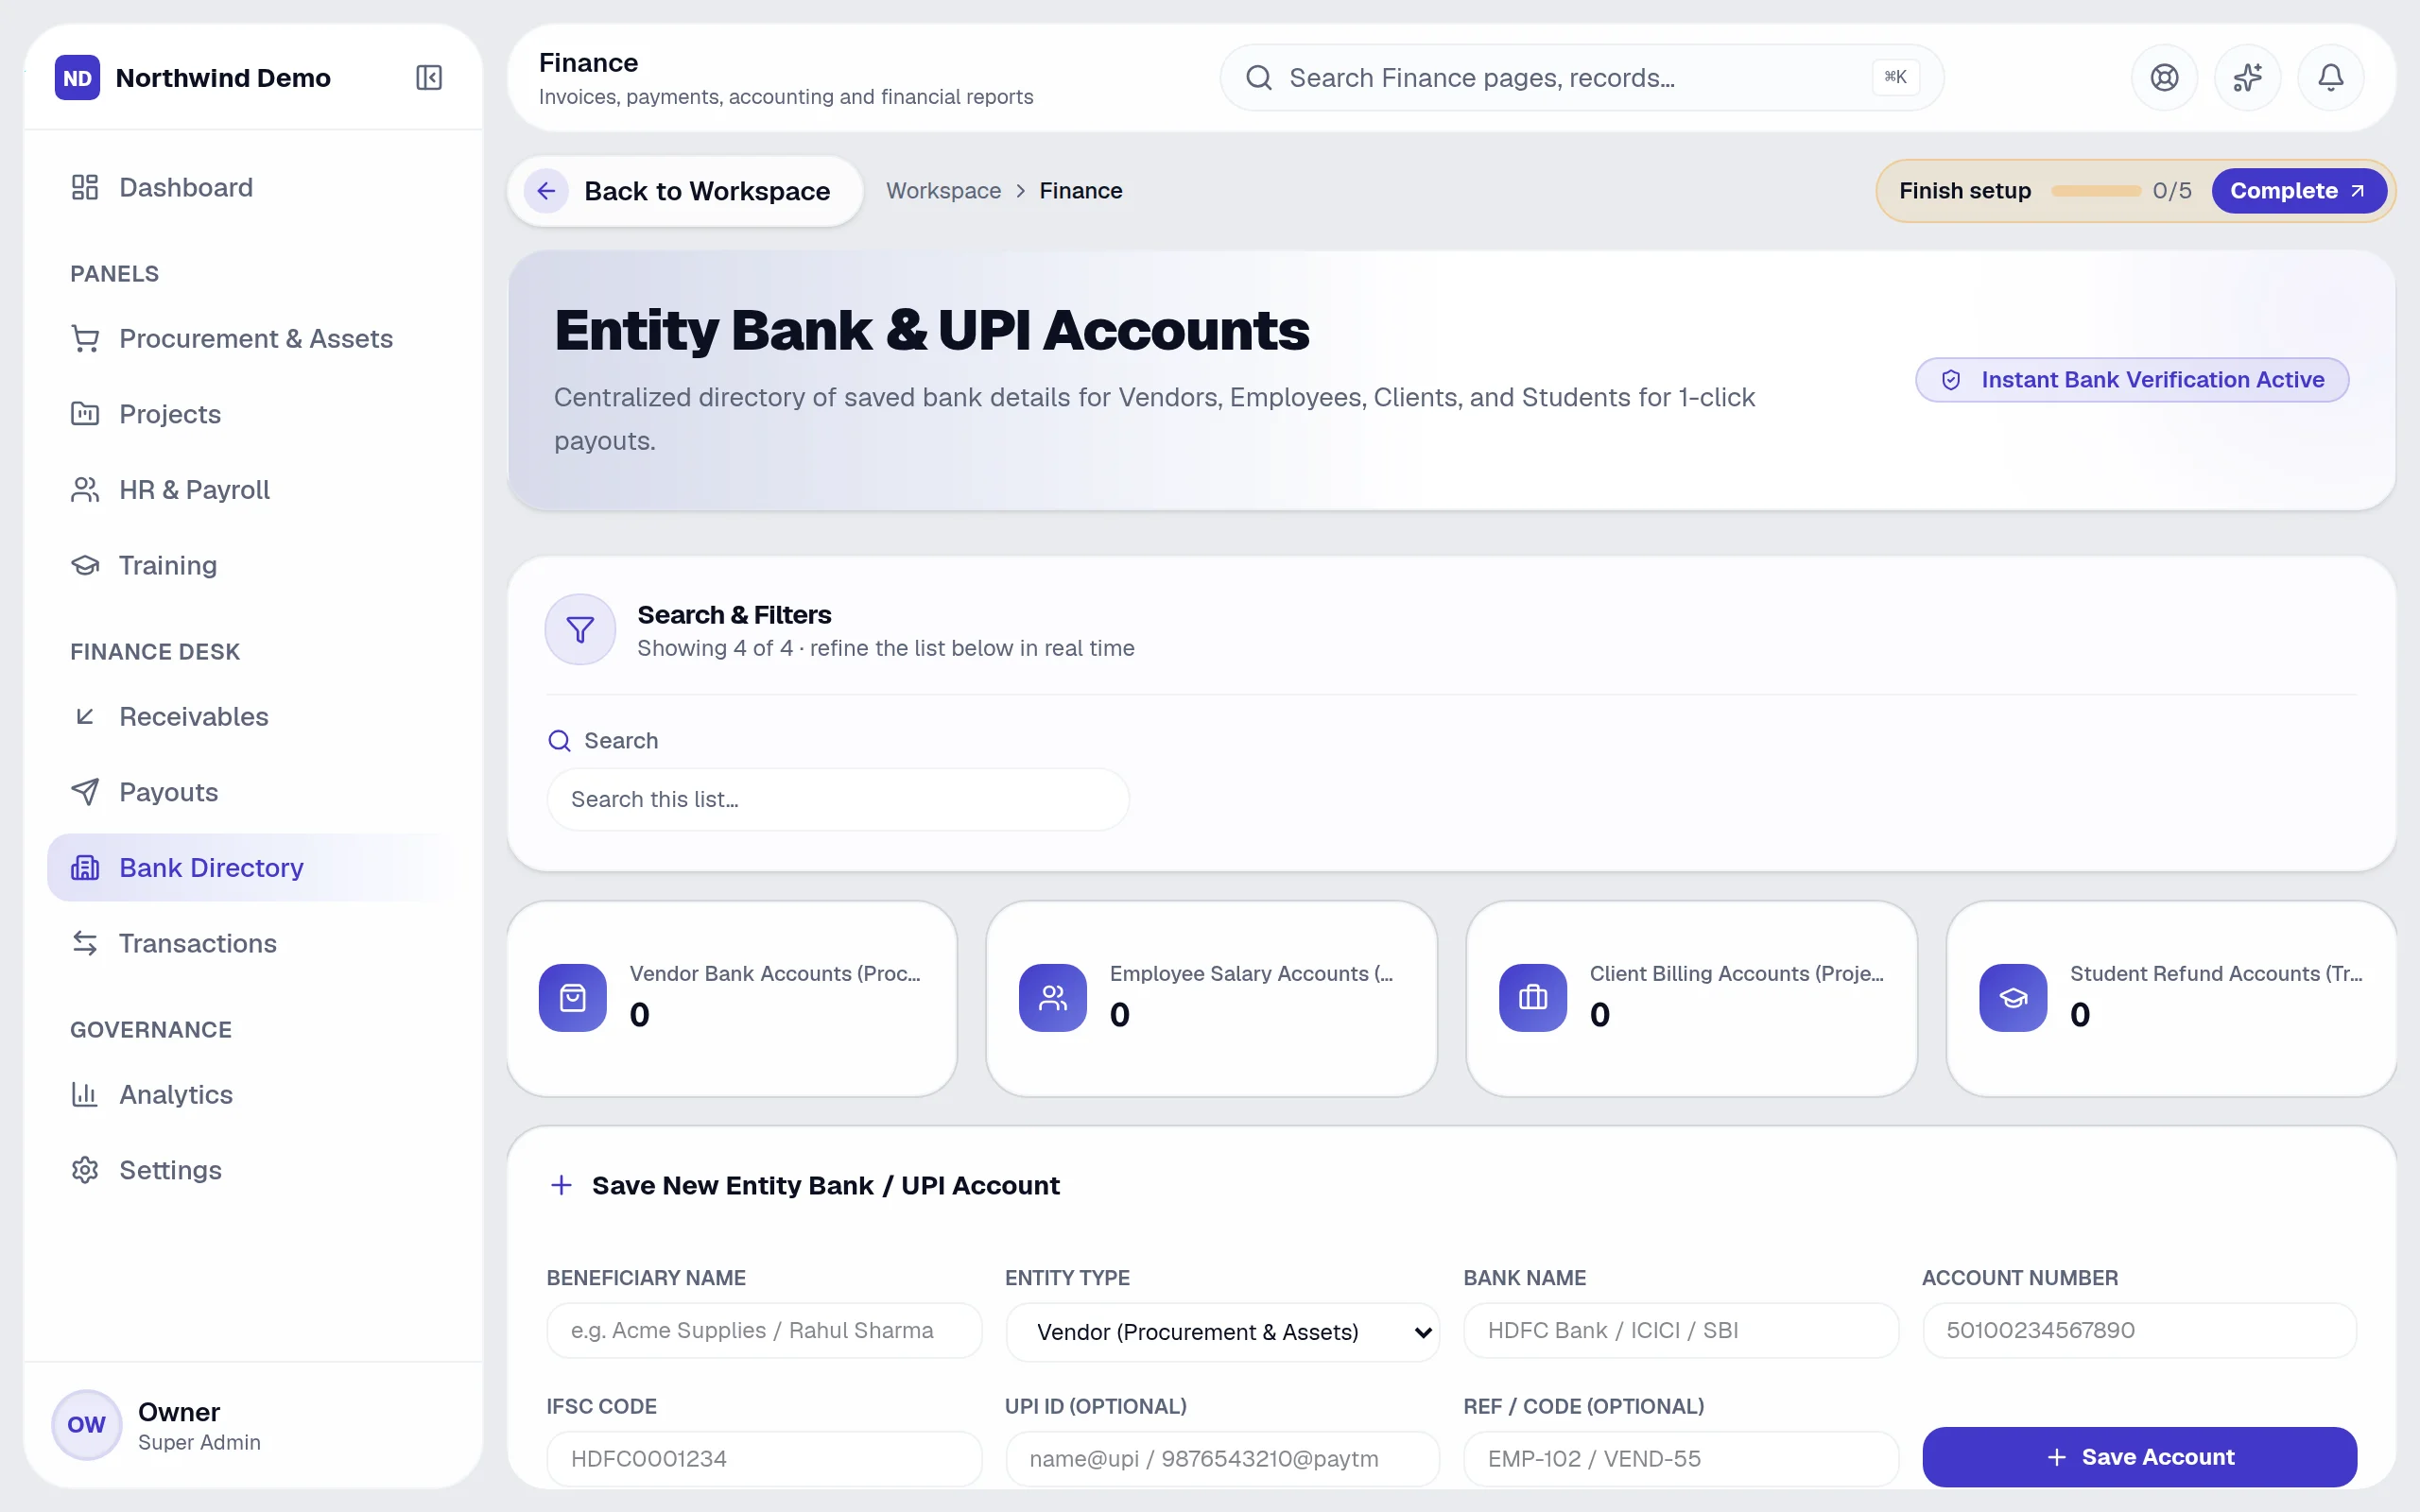
Open “Entity Bank & UPI Accounts”
In the left menu of Finance, open the page called “Entity Bank & UPI Accounts” (some pages sit inside a menu group — click the group to expand it).
- 3
Step 3
Choose a view
Use the tabs at the top of the screen to switch between:
- All Accounts
- Vendors (Procurement & Assets)
- Employees (HR & Payroll)
- Clients (Projects)
- Students (Training)
- 4
Step 4
Find what you need
Type in the search box (“Search this list…”) to find a record quickly.
- 5
Step 5
Narrow the list
Use these filters to see only what you want:
- Search
- Beneficiary Name
- Entity Type
- Bank Name
- Account Number
- IFSC Code
- UPI ID (Optional)
- Ref / Code (Optional)
- 6
Step 6
Read the list
Each row shows:
- Beneficiary / Entity
- Source Panel
- Bank Name
- Account Number
- IFSC
- UPI ID
- Actions
- 7
Step 7
Other actions on this screen
You will also see these buttons:
- Save Account
- 8
Step 8
Done
Beneficiaries and bank details.
Tips
- You can use more than one filter together (Beneficiary Name, Entity Type, Bank Name) to see exactly the records you want.
- The search box accepts: Search this list…. Start typing and the list narrows down.
- The tabs (All Accounts, Vendors (Procurement & Assets), Employees (HR & Payroll), Clients (Projects)) show different views of the same data — switching tabs never changes anything.
- Click a row to open that record and see all of its details.
- If you make a mistake, open the record again and correct it. Changes are recorded against your name so your team can see who did what.
Quick recap
Open Finance → Open “Entity Bank & UPI Accounts” → Choose a view → Find what you need → Narrow the list → Read the list → Other actions on this screen → Done
What it connects to
CRM & Sales
Won clients become customers you can invoice.
Projects
Milestones raise invoices; project costs feed profitability.
HR & Payroll
Payroll runs and salary payments arrive from HR.
Procurement & Assets
Matched vendor invoices become payables.
Training
Student fees and receipts.
What you will see on this screen
These are the parts of the Entity Bank & UPI Accounts screen, exactly as they appear in the product.
Tabs
- All Accounts
- Vendors (Procurement & Assets)
- Employees (HR & Payroll)
- Clients (Projects)
- Students (Training)
Search and filters
- Search this list…
- Search
- Beneficiary Name
- Entity Type
- Bank Name
- Account Number
- IFSC Code
- UPI ID (Optional)
- Ref / Code (Optional)
Columns in the list
- Beneficiary / Entity
- Source Panel
- Bank Name
- Account Number
- IFSC
- UPI ID
- Actions
Buttons
- Save Account
Sections
- Search & Filters
- Save New Entity Bank / UPI Account
- Saved Beneficiary Directory
Why use Finance
Finance replaces accounting & invoicing software, on the same login and the same data.
- Books that close faster, from live transactions
- Customers pay online straight from the invoice
- Salary, vendor and project money posts itself — no re-entry
- Reports your accountant can use as they are
Who uses Finance
Finance managers
Approve payouts, watch cash flow and close periods.
Accountants
Post, reconcile and report from the ledger.
Collections & receivables
Send invoices and payment links and chase what is overdue.
Auditors
Read-only access to reports and the audit trail.
More in Money out
FAQs
Common questions.
About Vendors & bank directory and Finance.
I cannot see Vendors & bank directory in the menu.
Your role may not include it. Ask your workspace owner to open Workspace → Users and give your role access to Finance.
Can I do this on my phone?
Yes. SelfRun AI works in the browser on any device and can be installed as an app on Android, iOS and desktop, with the same screens and the same data.
Does this cost extra?
No. Vendors & bank directory comes with the Finance panel, and every panel is included in every plan.
What is SelfRun AI?
SelfRun AI is a cloud platform that brings your sales, HR, finance, projects, procurement, training, documents, website and team communication into one system, with AI and workflow automation running through all of it.
Do I need to use every module?
No. Each plan includes a set of modules and you switch on only what you need during setup. You can turn modules on or off later from your workspace settings.
Is there a free plan?
Yes. The Free plan is free forever for one person and includes every panel and every feature — no card needed. Paid plans add more people and bigger storage, AI, email and voice allowances.